Innovate & Create! – WEEK 1

Website

Podcasts!

Day 1

6/13/16

My first day of camp as well as some of the Girls Scouts was overwhelming as well as extremely fun. In the end I am just happy that I survived but also learned the girls names and a little bit about them. I was pleasantly surprised with how well many of the activities went – especially the Stream of Consciousness exercise.

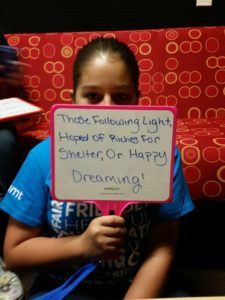
Originally we decided to have them continually write for 3 minutes however we tried 10 minutes and all most all of the girls diligently wrote the entire time and complained that it was not enough time after words. I was thrilled to see so many budding writers in class. We even allowed them to continue writing and they did so without any push or help. This was shocking to me because I have always imagined being met with resistance for writing. Many of the girls, even the ones that refused to write came up with unique ideas during the 10 minutes. I would like to have the girls do a 5 minute stream of consciousness everyday to get the creativity flowing. I am very excited to see what they create tomorrow when we discuss poetry more in depth.

One thing that I felt could have been better was the use and creation of emails so that the girls could have websites. The girls could get it, however it was a lengthy process as well as frustrating. Another thing I noticed was that once we changed the lesson plan, it was impossible to get back on track. It was very well organized in the morning and then the afternoon we were trying to figure out where to pick up ect…

We had planned to give them a writing prompt: “And suddenly the 30 strangers in the room felt like the closest of friends.” Instead we went to Start – Up exhibit which was fun but then we were unable to follow our curriculum afterwards. In the end this did not matter as all the girls wrote stories without the prompt or worked on their website. The problem was that it created a time crunch and we ended up not doing the last activity either which was to learn photoshop. We instead created pixel art logos that we will digitize tomorrow. In the end we did not lose anything important and in fact covered well with the pixel activity.

Day 2

6/14/16

Today was extremely successful and fun for me, although I know that Victoria had a rough time at one point. We started the day off with designing a personalized Luchador mask, which started with a name, then draw your mask and thus extended into creating the mask physically. We then split into two groups and one group focused on doing Haiku while the other did erasure poetry. After that we finished up the day with sharing our poetry to the entire group and then cleaning the classroom.

For our icebreaker we decided to talk about Luchador masks. We found a fun website that would generate a Luchador name. This was extremely hilarious and fun. The girls all picked out a name and wrote it on their Kleenslate board. Then they drew what they would want their masks to look like. They were having so much fun we decided to extend the activity and brought out Art supplies so that they could create physical representations of their masks.

After this, we split the girls into two groups and I took half and Victoria took the other half. We needed to do this because the Erasure Poetry required photoshop and we did not have enough computers with that application. In my group, we talked about Haiku and how to create it. Then we played with Haikucubes to help us create them. I came up with multiple challenges for them using the cubes. They had so much fun. Some of the challenges:

  • Create a group Haiku
  • Make a Haiku with only the words on the blocks
  • Choose one word and that is your Title
  • Choose three words and each word starts each line of the Haiku
  • Each girl takes turns and chooses one word until we make a Haiku

20160614_142834
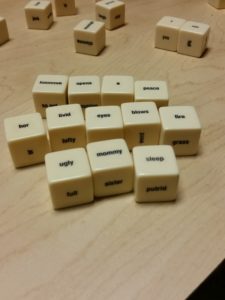
The first group excelled with this activity and Anthony did interpretive readings of their haikus. I did have one girl who told me she will not participate and as hard as I tried I could not get her to join the activity.

Unfortunately, while this activity was going on, Victoria had a very frustrating time with her group during the Erasure poetry because MOST of the girls refused to participate in the activity. They just flat out said “We refuse to participate.” They acted silly and played games behind Victoria’s back. After lunch we switched groups and I also had a very hard time with the group. They participated but refused to follow directions and just screamed and acted wild. We still accomplished haikus however which I was happy for. They also performed interpretive readings at least. We decided to be more careful with which girls get grouped together.

Day 3

6/15/16

Today was Bandojo day. We started the day off with updating their blogs from poetry day. Then our guest speaker taught them how to use Bandojo until lunch time. After that we introduced podcasting to the girls and then split them into 3 groups and had them facilitate a podcast. After this we had them make and record their own music in Bandojo in groups of two.

20160614_114426

Day 4

6/16/16

We went to Meow Wolf today!

Day 5

6/17/16


Scratch Programming Intro – Maze Game

Objective:

Introduce, demonstrate and facilitate using Scratch Programming and a makey makey controller.

Goals:

Create a video game

Create an animation scene

Merge video game and animation

Use makey makey to control game

  1. Introduce Scratch
    1. www.scratch.com
    2. Offer to create an account for saving purposes
    3. Click “Create”
  2. Background
    1. Show off images
    2. Find the X/Y coordinate image
    3. Demonstrate making a personalized backdrop
  3. Sprites
    1. Show off sprite images
    2. Demonstrate how to make your own sprite
    3. Grow / Shrink buttons
    4. Open X / Y Coord and show how to place sprite and where it is on the grid
  4. Scripts
    1. Make sure X/Y coord backdrop is open
    2. Event
      1. When Flag clicked to start program
    3. Control
      1. Forever loop
      2. If else loops
    4. Sensing
      1. (Sensing)Left, right buttons are clicked something will happen
      2. (Add to control loops)
      3. (Sensing) Show video ** ONLY IF TIME
    5. Looks
      1. (Looks)Change the costume
      2. (Looks)Say something
    6. Motion
      1. (Motion)Change by x
      2. (Motion)Change by y
      3. Positive and negative values
    7. Hitting a wall
      1. (Sensing)If hitting a certain color then reset sprite
    8. Reset Sprite
      1. (Motion)Reset sprite on start as well
    9. Point in direction
      1. (Motion)Point in direction left or right
    10. Backdrop
      1. (Looks) Change to next background
      2. (Sound) Add Sound
      3. (Scripts on BG) Add a sound script

Scratch Tutorial Game – Brick Breaker / Pong Game

This tutorial was written by Allie Burnquist for Start-Up Studio at the Natural History Museum in Albuquerque, New Mexico. It describes a Brick Breaker / Pong Paddle Type game.

  • Create New Project
      1. File: New
      2. Rename Project
      3. Right-Click Cat Sprite and select Delete
  • Create Paddle
      1. Option 1 – Choose new Sprite from Library
      2. Option 2 – Paint new Sprite and name it Paddle
  • Give your Paddle Sprite Motion
      1. Events: Add when flag clicked
      2. Motion: Add go to X: 0  Y: -150
        1. Test: Move your Paddle Sprite anywhere on the Stage and then press the flag on the upper right hand of the Stage. Does your Paddle move back to the starting position?
      3. Control: Add a forever loop under the Motion command
      4. Control: Add an if/then statement inside of the forever loop
      5. Sensing: Add key space pressed? block into the if/then statement. Select the drop down menu on the key space pressed and select right arrow
      6. Motion: Add change x by 10 inside the if/then statement under the key right arrow pressed then and change 10 to 15
        1. Test: Press the flag again to reset the Paddle and press the right arrow key. Does your paddle move right?
      7. Select if/then statement and drag out of the forever loop. Select the duplicate stamp and stamp the if/then statement to create a duplicate. Drag one under the other until they attach. Drag both back into the forever loop.
      8. Select the drop down menu on key right arrow pressed in the second if/then statement, then select left arrow. Change move 15 steps to -15 steps inside of the second if/then statement.
        1. Test: Press the flag again to reset the Paddle and press the left arrow key. Does your paddle move left? Now try the right arrow key. Does that still work?
        2. Note: At any time you can use the duplicate, delete, shrink or grow an item. You can also copy Script from one Sprite to another by grabbing the Script and dragging it over the Sprite you wish to copy to.
  • File: Save Now

Now we have a Paddle that moves both left and right. Time to work on our Ball.

  • Create Ball
      1. Option 1 – Choose new Sprite from Library
      2. Option 2 – Draw new Sprite and Name it Ball
  • Give your Ball Sprite Motion
      1. Events: When flag clicked
      2. Motion: Go to X: 0  Y: 190
        1. Test: Move your Ball Sprite anywhere on the Stage and then press the flag on the upper right hand of the Stage. Does your Ball move back to the starting position?
      3. Motion: Point in direction 90 under Motion command
      4. Operators: Add pick random 1 to 10 into the point in direction, replacing the 90. Change the 1 to 10 and the 90 to 225
      5. Control: Add a forever loop under the Motion command
      6. Motion: Add move 10 steps into the forever loop and change 10 to 15
        1. Test: Press the flag again to reset the Paddle and activate the Ball. What happened to the ball? Try pushing the flag a few more times. Does the ball come down too fast? Try adding a wait 1 second Control before the forever loop. Play with the time. I like .5 seconds. How do we get the ball to bounce back?
      7. Motion: Add if on edge bounce into the forever loop under move 15 steps.
  • File: Save Now

Now we have a moving Paddle and bouncing Ball, but we need to stop the ball from going through the Paddle.

      1. Control: Add an if/then statement inside of the forever loop under the if on edge, bounce Motion
      2. Sensing: Add touching? block Select the drop down menu and select Paddle.
      3. Motion: Add point in direction 90 under touching Paddle
      4. Operators: Add pick random 1 to 10 into the point in direction, replacing the 90. Change the 1 to 90 and the 30 to -30
        1. Test: Press the flag again to reset the Paddle and activate the Ball. Use your right and left arrows to move the Paddle and stop the ball from hitting the bottom of the Stage
  • File: Save Now
  • Prepare the Backdrop and Add Sound
      1. Stage: Backdrops
      2. Add a rectangle along the bottom of the Stage
      3. Select Ball Sprite: Scripts
  • Controls: Add if/then statement inside the forever loop under the first if/then statement
  • Sensing: Add touching color? into the if/then statement. Click the square of color in the touching color? block then select the rectangle on the bottom of the Stage
  • Sound: Add play sound pop into the if/then statement under touching color? block
  • Controls: Add stop all into the if/then statement under play sound pop Sound
  • Test: Press the flag again to reset the game and try to play. Where did the sound go? Stop all ends up stopping the sound before it starts. Try placing a wait 1 second block between the play sound pop and stop all. Try playing with the time until you find one that works. I like .05. Once you find the right time, try to play the game again. Does everything work now? How could the game be better?
  • File: Save Now

If everything is working right there are a few more things we can add to make our video game more dynamic.

  • Adding a Game Over Screen
    1. Option 1 – Choose new Backdrop from Library
    2. Option 2 – Paint new Backdrop
    3. Add text and decorate the page however you would like and move back to the Script for Ball Sprite by clicking on the Ball Sprite
    4. Looks: Add switch backdrop to block in the second if/then statement in the forever loop between the play sound pop and wait .05 seconds. Select the drop down menu on the switch backdrop to block to backdrop 2
    5. Select backdrop 1 in backdrops and press the flag to see if it works. Want to hide the Ball and Paddle Sprites when the Game Over Screen comes up?
    6. Looks: Add hide block into the second if/then statement in the forever loop between switch backdrop to block and wait .05 seconds block and try again.
    7. Events: Add broadcast block into the second if/then statement in the forever loop between hide block and wait .05 seconds block. Select the drop down menu and choose new message and name the message Game Over.
    1. Select the Paddle Sprite
    2. Events: Add when I receive to the Script. Select the drop down menu and choose Game Over message
    3. Looks: Add hide block to the when I receive Game Over event

Right now the Ball and Paddle are hidden so we need to add a show command.

      1. Events: Add when space key pressed. Select the drop down menu and select space
      2. Looks: Add show block to when space key pressed
      3. Select go to X: 0  Y: -150 and drag script away from when flag clicked block and move to the when space key pressed block under show block
      4. Looks: Add hide block to when flag clicked
  • File: Save

This is the final Script for the Paddle! We want to match the start commands with the Ball, so select the Ball Sprite to change the Script and repeat the previous steps.

    1. Events: Add when space key pressed. Select the drop down menu and select space
    2. Looks: Add show block to when space key pressed
    3. Select go to X: 0  Y: 190 and drag script away from when flag clicked block and move to the when space key pressed block under show block
    4. Looks: Add hide block to when flag clicked
  • File: Save

This is the final Script for the Ball Sprite. Next we will create a title screen

  • Adding a Title Page
      1. Option 1 – Choose new Backdrop from Library
      2. Option 2 – Paint new Backdrop
      3. Add text and decorate the page however you would like. Press Script at the top of your work area next to Backdrops.
      4. Events: Add when flag clicked
      5. Looks: Add switch backdrop to block. Select the drop down menu and select the background you created for a Title screen. Mine is called Backdrop 3
      6. Controls: Add forever loop under the Looks command
      7. Controls: Add if/then statement into the forever loop
      8. Sensing: Add key pressed? block into the if/then statement
      9. Looks: Add switch backdrop to block to the if/then statement under the key pressed block. Select the drop down menu and select the game play backdrop with your rectangle at the bottom of the screen. Mine is called Backdrop 2.
        1. Test: Click the flag in the upper right hand corner of the Stage area and play your game. Does everything work? What else could we add?
  • File: Save

This is the final Script for the Backdrops. Now we can either add a score counter.

  • Adding a Score Counter
    1. Select Ball Sprite to enter Ball Sprit Script
    2. Events: Add when flag clicked
    3. Data: Select make a variable and name variable Score (make sure for all Sprites is selected) and check mark Score variable
    4. Data: Add hide variable to when flag clicked block. Select drop down menu and select Score
    5. Events: Add when key pressed block. Select drop down menu and select space.
    6. Data: Add show variable to when space key pressed. Select drop down menu and select Score
    7. Data: Add set to under set variable Score. Select drop down menu and select Score set blank number to 0
    8. Control: Add forever loop under set score to 0 block
    9. Control: Add if/then statement inside forever loop
    10. Sensing: Add touching? block to if/then statement. Select drop down menu and select Paddle
    11. Data: Add change by block to if/then statement under touching paddle? block. Select drop down menu and select Score and set blank number to 1

Summer 2016 Innovate and Create Camp Week by Week Lesson Plan

Camp Website

Podcasts!

Camp will be 4 weeks long starting between June 1st and July 31st. We will have a week off in between each class to prepare for the next week.

Each day will be split into two blocks, one being taught by Victoria and one being taught by Bresdin. The girls will spend half of their day in one block and the second half in the other. This will also provide a way for new girls to be caught up on past objectives they missed in previous weeks with the other girls can advance.

Each girl will create a website / blog on the first day that will continue to be updated by them as the weeks go on. They will be virtual scrapbooks. During this time we will teach them internet safety and guidelines. Will need email signature forms for this

Objective:

To teach the girls how to work together as a team to complete a complex large goal such a creating a video game.

  • Storyboarding
  • Audio Mixing
  • Graphic Design
  • Website / Blogging
  • Internet Safety
  • Creating a board game
  • 3D printing
  • 3D modeling
  • Story Writing / Character creation
  • Scratch Programming
  • Processing (Java Programming)
  • Teamwork
  • Communication
  • Unity Development
  • (App Development?)
  • Game Jam

Week 1:

Objectives:

Learning various computer skills and art techniques that will help them in the coming weeks.

  1. (Graphic Design) Learning to clean up their drawings and photos on the computer.
    • Photoshop and Illustrator
      • This will be used later on when creating a board game and video game.
      • Using photoshop and illustrator to learn how to storyboard a story or scene.
      • Use to enhance their website
    • Drawing or painting
      • Learn how to storyboard a story or scene.
    • Typography and Color choices?
  2. Internet Safety and Culture
    • Safe Passwords
    • Malicious downloads
    • Internet predators and how to avoid this
    • Using search engines
    • ECT….
  3. Audio Mixing
    • Very important skill to use when creating a video game
    • Garageband
    • Little Bits
    • Sound recording
    • Will use in the following weeks many times
  4. Website building
    • Wix or wordpress
    • Blog format created by them personally
    • Will use skills each day to update and enhance website
    • Will be used to take notes and or publish the video game to later

Possible Guest Speakers:

Analisa or Jenna (Need to talk to Mariam)

Week 2:

Objectives:

Learning the elements to a game – Creating a board game individually and as a team.

  1. Playing and learning about different board games
  • This will help them learn the elements to games to create a video game on week 4
    • Defining what is a rule
    • creating characters
    • using cards
    • using pieces
    • Types of games – strategy, cards, chance ect
    • Themes
  • Writing and Storytelling
      • This will help when needing to come up with a video games storyline (If they choose to) Individually writing as well as group writing.
    • How to create characters / Creating heroes and heroines
    • Writing a plot line
    • Creating a theme
    • creating an experience
  • 3D Modeling
    • Will design 3D pieces for the board game
    • Tinkercad
    • Blender
  • 3D Printing
    • Will print pieces for the board game

Possible Guests

Jared Tarbel could lazer cut their board game design?

Chris McKillip sp-ent.com Makes and published aboard game. Local Video media company

Week 3:

Objective:

Teach programming and game development

  1. Scratch
    • Teach low level game design
  2. Processing
    • Teach low level programming
  3. Unity
    • Combine Scratch and processing
  4. 3D modeling and using in unity
    • Using their skills from previous weeks
  5. Turn board game into a video game
    • Turn previous weeks board game into video game to show how it is the same process
  6. Storyboarding
    • Continue to write and storyboard their games
  7. Testing and bug fixing
    • Learning how to make the game fun and get rid of pesky bugs in the game

Possible Guests:

Sean McCracken (If available – or might have him there next week)

Week 4:

Objective: Girl Scout Game Jam in Unity

Have the girls create a video game in one week as a team using communication and all previous skills picked up.

  1. All girls will work together to get different elements finished
    1. 3D modelers, writers, storyboarding, programming
  2. Come up with theme
  3. Create environments
  4. Create Characters

Unity 3D Level Design Tutorial for Innovate and Create

The following is the list I move through to introduce a workshop to Unity 3D:

Create a New Scene

>New Project

Give Name

Choose Desktop

3D is chosen

>Create Project

Objects

Hierarchy > Look at Main Camera, Directional Light

GameObject > 3 > Cube

Delete the light!!!

CTL + Z to get it back

GameObject > Light > Directional Light

Controls

Scroll Wheel – zoom in and out

Click and hold the scroll wheel – Grab scene left to right

Hold Right btn – Look Left to right

click CUBE to focus on cube

Click four directions btn > move cube

Click Turn button > rotate cube

Click Size btn > Change size

Click Morph btn > Change obj

click Hand to not do anything

Delete the cube

Add Terrain

GameObject > 3D Object > Terrain

Mesh to sculpt for terrain

Look in Assets

Moving about the scene

Scroll Wheel – zoom in and out

Click and hold the scroll wheel – Grab scene left to right

> Play

Move Camera

Create Controller

Look on desktop

Drag folder that says standard assets into unity

Wait

OR

Window > Asset Store > Unity Essentials > Asset Packs > Standard Assets > Download > Import(after download)

In unity:

Click Standard Assets > Characters > FirstPersoncontroller>Prefab

(a prefabricated Object.)

Drag onto scene

Unclick Main Camera

Play

OR

Assets> standard assets > characters > ThirdPersoncontroller > Prefabs

Take main camera and drag until you make it a part of the person.

Move the camera so that it looks at the person

Inspector

This will provide the tools to sculpt the terrain

Click on Terrain

Raise Terrain

choose brush and size and go

Lower Terrain

Hold shift and click

Smooth Height

smooth the terrain

Paint Textures

Edit Textures > add Texture > Paint

Keep adding textures

Detail Tree

AddTree > gameobject > choose tree > paint

Keep adding!

Paint details

Edit details

play with settings

Creating an application

Code for Exit button :

void Update() { if (Input.GetKey(KeyCode.Escape)) { Application.Quit(); } }


drag that script onto the camera


File > build settings > PC or Mac > Build.

this can be uploaded onto the drive and played at home.